Interfaces

As you have seen in the previous post, Abstract Base Classes can have both abstract as well as non-abstract methods. But if you need to define a class, which just contains abstract methods and nothing more, in other words a “pure abstract base class” you would create an Interface.

An interface is very much similar to a pure abstract base class. It can contain only abstract methods and no method implementations. An instance of an Interface can never be created. An interface instead is used to indicate that a class that implements the particular interface must implement the members listed by the interface.

Earlier, we had said that classes are like moulds that define the methods and data members an object should have. Similarly, an interface can be considered as being a mould for a class. It indicated what a class must provide.

Let us take a look at some code depicting Interfaces. Consider Example 6,

Example 6:

Interfaces Example 6

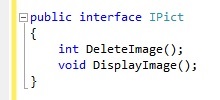
Example 6 depicts an interface. Interfaces are defined in the same way as classes except that the interface keyword needs to be specified after the access modifier, followed by an interface name. Interface names usually begin with the letter I depicting it to be an interface.

The method definitions go in between the open and close curly braces. In Example 6, we have defined two operations (remember in the last post we had pointed out that ‘operations’ is the name given to methods which do not have an implementation). The two operations are DeleteImage(), which returns an integer and DisplayImage(), which neither takes in any parameters nor returns any value. Also interface members do not have any access modifier, it is the class, which inherits them, that sets their visibility.

Interfaces can also have data members. However, an interface cannot have fields or only data members. It can only have properties. We shall discuss properties, their types and how to create them, in a later post.

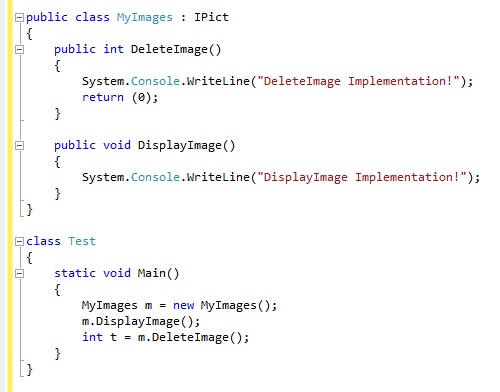
Example 7 implements the interface shown in Example 6.

(Note the terminology, when a class makes use of an interface it (the class) is said to implement the interface.)

Example 7:

Interfaces Example 7

If we merge the code in Example 6 and Example 7 and compile it, it would give us the following output:

DisplayImage Implementation!
DeleteImage Implementation!

In Example 7 we create a new class, MyImages, which implements the interface IPict.

  • Note the syntax for implementing the interface. As in case of implementing inheritance, here too, the colon (:) operator is used.
  • Within the curly braces we have defined the implementations for the methods in the interface. An interesting point to note here is that unlike in the case of abstract base classes, we are not overriding the methods but just implementing them, hence, the keyword override need not be specified at all.
  • The manner in which the class is instantiated in the Main() method and the manner in which its methods are called remain unchanged.

A class can implement an interface as well as inherit from another class. Consider another class called BaseIO with the implementation as shown in Example 8.

Example 8:

Interfaces Example 8

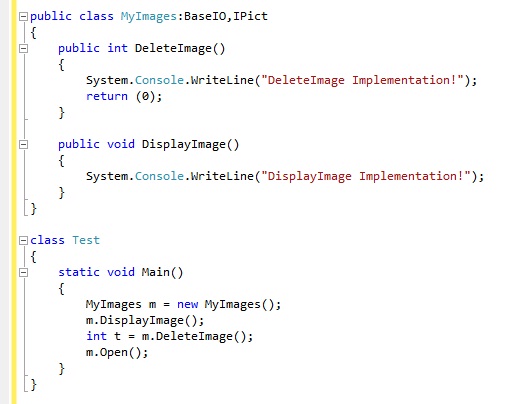
Now, suppose we want to inherit the MyImages class from this class. We can always do so. The code would look as shown in Example 9.

Example 9:

Interfaces Example 9

The output of Example 9 will be as shown below:

DisplayImage Implementation!
DeleteImage Implementation!
This is the Open method of BaseIO

(If you have to get the above result you need to add the code in Example 8 and Example 6 into Example 9.)

Note that if you want to inherit from a class as well as implement an interface you use a comma (,) between the class name you wish to inherit from and the interface you wish to implement. The rest remains just the same.

1.   Multiple Interface Implementation

C# does not allow multiple class inheritance. However, it allows multiple interface implementations. A class can implement more than one interface. Consider Example 10 as an extension of the previous examples.

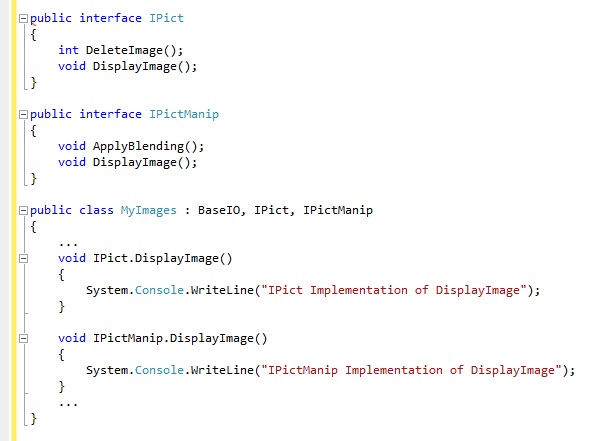
Suppose we have another interface called IPictManip, which consists of only one method to apply alpha blending to our images. The code for this will be as shown in Example 10,

Example 10:

Interfaces Example 10

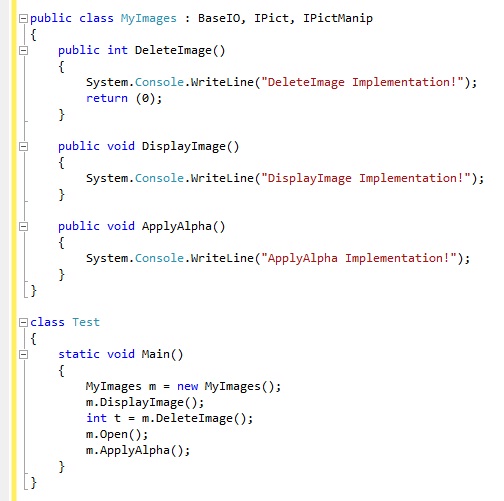
If we wanted to use the functionality of the above-mentioned interface into the class MyImages (meaning implementing two interfaces, IPict and IPictManip) we will need to write code (for declaring MyImages) as shown in Example 11.

Example 11:

Interfaces Example 11

The output of Example 11 will be:

DisplayImage Implementation!
DeleteImage Implementation!
This is the Open method of BaseIO
ApplyAlpha Implementation!

As you can see in Example 11, all you do is add another comma and the interface name during the MyImages class definition (the part made bold in Example 11). We implement the ApplyAlpha() method within class MyImages and call methods as usual.

Multiple interface implementation is completely acceptable in C# as long as no naming conflicts occur. For example if both interfaces (IPict and IPictManip) have an operation called DisplayImage with the same signature (return types and parameters), we have a problem, since it is not possible to specify which interface we are implementing when we write the implementation for the method DisplayImage().

C# provides us with a solution for this problem by providing Explicit Interface Implementation. We shall discuss this in the next section.

2.   Explicit Interface Implementation

To specify which interface a member function is implementing you need to qualify the member function by putting the interface name before the member name. Getting back to the previous example, consider that the operation DisplayImage() exists in both the interfaces (IPict and IPictManip). This poses a problem of ambiguity. Explicit interface implementation cab be used to solve this problem. The corresponding code will be as shown in Example 12.

Example 12:

Interfaces Example 12

3.   Interface Inheritance

New interfaces can be created by combining together other interfaces. The syntax for this is very similar to that used for inheritance, except that more than one interfaces can be merged to form a single interface.

Suppose you want to merge two interfaces IPict and IPictManip into one interface IPictAll you would need to do the following.

Example 13:

Interfaces Example 13

Abstract Base Classes

A situation may arise where you need to only inherit from a certain class, but need not instantiate objects of that class. In such a case the base class can be regarded as “incomplete”. Such classes are known as Abstract Base Classes. C# allows creation of Abstract Base Classes by an addition of the abstract modifier to the class definition. Instances of abstract base classes cannot be created.

These abstract base classes can only contain the method definitions, the actual implementation of the method is made only in the derived class. This means that the abstract base class holds only the function prototypes (the return type of the method, the name and the parameters it takes) but no code for the body (the implementation of the method, the code which defines what the method has to do). The body of the function is written in the derived class. The method with no implementation is known as an operation.

Consider the following example,

Example 5:

Abstract Base Classes Example 5

The output of Example 5 will be,

This is the AFunc() method!
This is the BFunc() method!

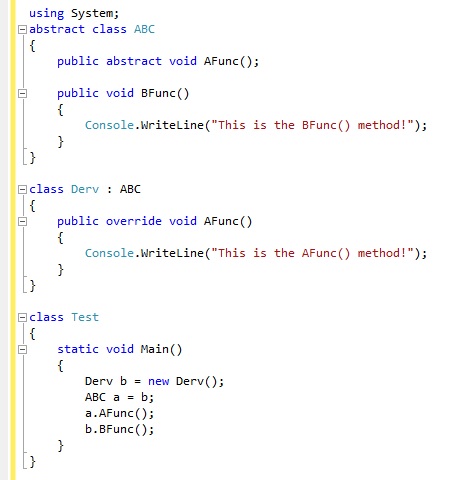
In Example 5 we have declared an abstract base class by the name ABC. Note that to declare a class as abstract we just need to add the abstract keyword to the regular class syntax.

  • An abstract base class can also contain methods with implementations, apart from containing abstract methods (operations).
  • The operations also need to be marked with an abstract keyword.
  • The operations definition always ends with a semi-colon.

Getting back to Example 5, we have created a new class named Derv, which derived from class ABC. Thus, the class Derv can override the abstract AFunc() method of its base class ABC.

To override the abstract method from the abstract base class the syntax is very similar to that of overriding a virtual function. All you have to do is,

Specify,

  • The keyword override.
  • Make sure that the method names are just the same, including the parameters.
  • Write the necessary code (implementation).

In Example 5, in the Main() method we have declared an object of type ABC (which is the Abstract Base Class). However, note here that we are just creating an object of type ABC, we are not instantiating an object of that type. If we try to instantiate the object, the C# compiler will generate an error as instances of ab abstract base class cannot be created.

When the AFunc() method of class ABC is called it automatically calls the overridden function of class Derv. Also note that we have created an object a of the type ABC (this Abstract Base class) and we have simply copied the object to another object (remember they belong to reference types so only the reference is copied). Now we can use object a just as object b. In the Main() function we have tried calling AFunc() and the BFunc() methods just as we do from object  b and, as you can see in the output, it works just the same.

Polymorphism In C#

C# is a genuine object-oriented programming language. It Implements all of the major OOP features including polymorphism. Polymorphism and virtual functions go hand in hand. In fact polymorphism is achieved using virtual methods. Polymorphism allows you to implement methods of the derived class during run-time. Polymorphism sounds confusing at the beginning thus, many times people tend to skip this topic. It takes a little patience and dedication to learn the advantages offered by this OOP feature.

Looking at some code should help make things clear.

Consider Example 1,

Example 1:

Polymorphism in C# Example 1

In Example 1 we create a class DrawObj, in which we define a virtual method called Draw(). All that the Draw() method does is that it displays a message on the user’s screen.

A point to note here is that the Draw() method is a virtual method. Note the syntax, it is similar to the one for a normal method except that the virtual keyword needs to be specified.

Virtual functions come in handy when we need to call the derived class method from an object of the base class.

Suppose you need to assign a group of objects to an array and then invoke each of their methods. They will not necessarily have to be the same object type. However, if they are related by inheritance, you can add them to the array as the inherited type. Then if they all share the same method name, that method of each object can be invoked. This may sound a bit confusing. The following example will make things clearer.

Consider Example 2 as an extension of Example 1.

Example 2:

Polymorphism in C# Example 2

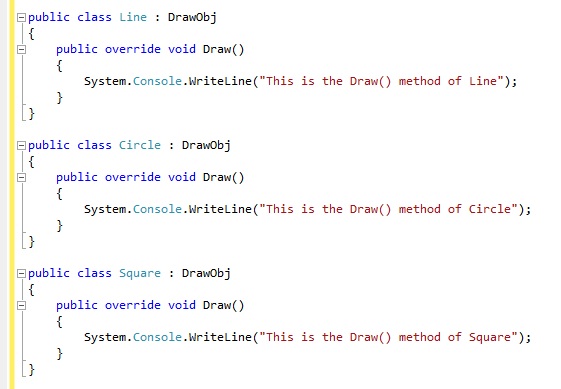
In Example 2, we have defined three classes (namely Line, Circle and Square). All of them are derived from the class DrawObj and all of them override the Draw() method of the DrawObj class.

So far we have been building the program part by part. Next we shall write the Main() function of the program, which will bring all these pieces (and classes) of code together, in Example 3.

Example 3:

Polymorphism in C# Example 3

If we merge the code in Examples 1, 2 and 3, compile and run, the output will be,

This is the Virtual Draw method
This is the Draw() method of Line
This is the Draw() method of Circle
This is the Draw() method of Square

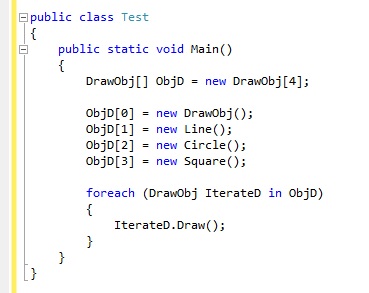
Note the output. The Draw() method for each and every class derived from DrawObj has been called. However, we have written the Draw() method only once. Then how did this happen? Simple, note that the Draw() method has been written inside the foreach loop, which iterates through the DrawObj type objects in the array ObjD and calls the Draw() method. You would want to know how the method of the derived class is called while the array is of type DrawObj (the base class). This happened just because the code that we wrote exhibits polymorphism.

In the Main() function of Example 3, we have declared an array called ObjD to hold four objects of the type DrawObj. Next we have initialized the array with objects of the derived classes (namely line, circle and square). The first element being, of course, the DrawObj itself. We are allowed to assign the objects to an array of the base class because of the inheritance relationship that the derived class objects have with the DrawObj. Inheritance allows derived objects to act like their base class objects, which saves us a lot of coding. If this was not possible we would end up creating a different array for each type.

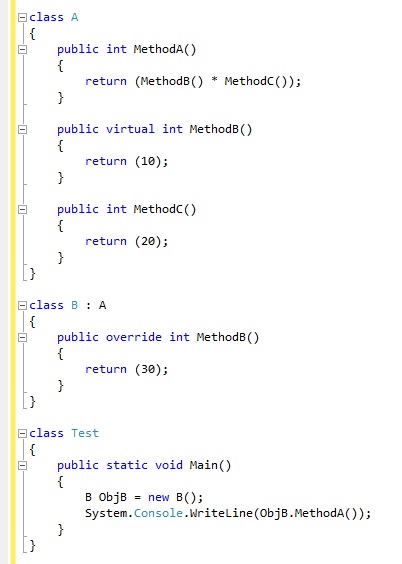
In case you need another example to clear doubts you might have on polymorphism, consider Example 4.

Example 4:

Polymorphism in C# Example 4

The output of Example 4 will be:

600
    • Note that the MethodA() is not overridden in class B. When we call MethodA() from an object of class B, the MethodA() of class A gets called as class B is inherited from class A.
    • Now MethodA() of class A needs to call MethodB(). There exists a MethodB() in class A as well as in class B.
    • Now if we were to use the normal method overriding, and had not defined our overridden methods as virtual, the MethodB() of class A would have been called and the output would have been 200.
    • Next, we have specified the MethodB() of class A as virtual and also overridden this MethodB() of class A in class B.
    • Since the call to MethodA() has come in from class B, the overridden method in class B is called.
    • Polymorphism is not just overriding it is intelligent overriding.
    • The difference between overriding and polymorphism is that the decision as to which method to call (whether the base class one or the class from which the object was instantiated) is made at runtime!
    • Remember, Polymorphism requires virtual functions, and virtual functions in turn require method overriding, that is the association between polymorphism and overriding.