Types of Assemblies


You can create two types of assemblies:

  • Private assemblies

When a C# program is compiled a private assembly is created, by default. These types of assemblies need to essentially be placed in the same folder as the calling application. Alternatively the assembly can be stored in a sub folder within the folder containing the calling application. In a scenario where many applications need to use the same private assembly, copies of the assembly need to be made and placed in the folders where the applications reside. With private assemblies you just need to ensure that the assembly name is unique within the application.

  • Shared assemblies

If you want to use the same assembly with other applications, you need to make the assembly a shared assembly. For a shared assembly to be used by many applications there should be no naming clashes with other assemblies. The name of the shared assembly must be unique across the entire system. The share assembly is placed in the global assembly cache found in the <drive>:\Windows\Assembly where <drive> refers to the drive on which your .NET framework SDK is installed. Picture below displays the global assembly folder on the file system.

Types of Assemblies Global Assembly Cache

Creating Assemblies

One or more source files can be compiled into an assembly. Now let us see how an assembly is created.

1.   Creating Assemblies from Source Files

To create an assembly directly from one or more source files you need to use the following command:

C:\> csc /out:<assembly name> /target:library <filename1 filename2..>

The following command creates an assembly called array.dll from the file array1.cs.

C:\> csc /out:array.dll /target:library array1.cs

2.   Creating an Executable that References an Assembly

  • Creating an Executable

You can create an executable by compiling the source file using the /target:exe switch. For example, to create an executable from a .cs file you can use the following command:

C:\> csc /out:<executable name> /target:exe <filename1 filename2..>

The following command creates an executable array.exe from  the file array1.cs.

C:\> csc /out:array.exe /target:exe array1.cs
  • Referencing an assembly

To reference an assembly you need to add the /reference switch while creating the executable. The following command is used to reference an assembly.

C:\> csc /out:<executable name> /target:exe /r:<assembly name1;assembly name2..;> <filename1 filename2..>

The following command creates an executable called array.exe from the source file array1.cs while referencing an assembly called aray2.dll. Modules cannot be referenced; only assemblies can be referenced.

C:\> csc /out:array.exe /target:exe /r:array2.dll array1.cs

3.   Comparing Namespaces and Assemblies

You can deploy classes within the same namespace into different assemblies and classes within different namespaces into one assembly. However, there are some differences between namespaces and assemblies, which are listed in below table.

Namespaces Assemblies
Logical compile time mechanism Physical compile time mechanism
Not a run-time entity Is a run-time entity
Provides a logical structure to the names of source code elements Provides a physical structure to the run-time components of an executable

The .net Base Class Library

The .net Base Class Library (BCL) is one of the most comprehensive libraries available at your disposal to start creating applications. The BCL is a huge mass of pre-written code that you can easily incorporate and use in your applications. It contains classes with methods, which allow you to do most of the commonly used tasks. Most of the functionalities that a programmer might think of as being part of a language have been moved to the framework classes. For example, consider that you want to calculate the square root of a number. A function for calculating a square root is no longer available in C#. Instead, you will have to use the System.Math.Sqrt method from the Base Class Library.

However, note that the Base Class Library is shared among all .net supported languages. To find the square root of a number, Visual Basic, Ada and even COBOL will use the same base class function. This facility makes base class functionality highly consistent across al .net-supported languages as they all will call the square root function in a similar way.

Classes in the Base Class Library are categorized into namespaces based on their functionality. These namespaces have been compiled and packed into Assemblies. Assemblies will be discussed in detail in the future post. As for now think of an assembly as a .DLL file with all the namespaces, classes and methods packaged inside it.

The most commonly used namespaces have been listed out in below Table. This table also lists out the assembly that contains the namespace.

Namespace Assembly What it contains?
System Mscorlib.dll, System.Net.dll Much of the functionality of the BCL is contained within this namespace. Contains various other namespaces within it, some of them are listed below.
System.Array Mscorlib.dll Contains classes for manipulating arrays.
System.Threading Mscorlib.dll, System.dll Contains classes for Multi-Threading
System.Math Mscorlib.dll Contains classes for performing mathematical functions
System.IO Mscorlib.dll, System.IO.dll Contains classes for reading and writing to files and streams
System.Reflection Mscorlib.dll Contains classes for reading metadata from assemblies
System.Net System.Net.dll Contains classes for Internet access and socket programming

The .net Framework SDK provides you with a tool called WinCV. This tool is used to peek into the assemblies and see what classes are available within them.

We shall now discuss some of the important base class libraries. Let us begin with System.Array.

1.   The System.Array Namespace

The System.Array namespace provides us with classes and methods for manipulating arrays. We have learnt how to create and assign elements to arrays in previous sessions. Let us try to recollect how to create an array in C#.

The syntax for declaring an array is:

DataType[] identifier;

So if we want an array of type int, which can hold say 7 elements, we would write

int[] MyArray = {1,2,3,4,5,6,7};

Consider Example 13.
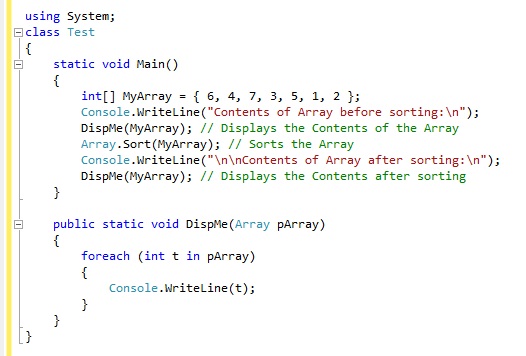
Example 13:

The .net Base Class Library Example 13

The output of Example 13 will be:

Contents of Array before sorting:
6
4
7
3
5
1
2

Contents of Array after sorting:
1
2
3
4
5
6
7
  • In Example 13 we have declared and initialized an array called MyArray with 7 numbers (from 1 to 7 in random order).
  • We have then displayed the contents of this array as they are. Note the “\n” in the Console.WriteLine() method. It has been used to enforce a new line. It is known as an Escape Sequence.
  • We sort the array using the Sort() method of the Array class. This class is present in the System namespace.

The syntax for the Sort() method is:

Array.Sort(ArrayToSort);

Where ArrayToSort is the name of the array to be sorted. Also you need to ensure that the System namespace has been imported using the using keyword else you need to prefix the syntax with System and the dot operator. The Array.Sort() method does not return any values.

  • We finally display the contents of the array after sorting the array using the method of the base class.

Also, if you notice, we have defined a new method called DispMe(). This method takes in one parameter, an array, and iterates through all of its elements displaying them with each pass. We have made use of the DispMe() method twice in the Main() method to display the contents of the array.

Let us try out one more example where we will look for a particular array element and return its position in the array.

Consider Example 14.

Example 14:

The .net Base Class Library Example 14

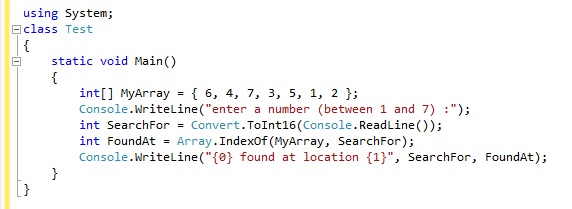
Note that in Example 14 we have  used the same array (MyArray) as in Example 13 with the same elements.

  • We first ask the user to enter a number between 1 and 7.
  • We accept this number using the Console.ReadLine() method.
  • But Console.ReadLine() returns a string, while we require an integer. To extract the int value from the string that the user has entered we use the ToInt16() method of the Convert class (The Convert class belongs to the System namespace).
  • The ToInt16() method converts the parameter to type short (short is the C# alias for System.Int16 struct).
  • We then search the array for the occurrence of the number the user has entered. To do this we use the Array.IndexOf() method. This method takes in two parameters, the first one being the array to search and the second being the number to search for. The Array.IndexOf() method returns the location of the number, entered by the user in the array.

The syntax for the Array.IndexOf() method is:

returnVar = Array.IndexOf(ArrayToSearch, WhatToSearch)

Here returnVar is the return type
ArrayToSearch is the Array that needs to be searched
WhatToSearch is the element that needs to be searched for in the array

  • Finally we display the location at which the number was found to the user.

There are two things of importance that you will learn from this example. Firstly, you must understand that C# is type safe, it checks for unsafe casts very strictly and will not allow you to type cast one variable type to another, which might result in data loss. Note that Console.ReadLine() returns a string, while we need an int value to search the array. This is the reason we must use the Convert.ToInt16() method to convert the string to an int.

Secondly, you know how to search an array for the occurrence of an element using the System.Array base class.

Other notable methods of the System.Array class along with what they do are listed below.

Method Syntax Does this…
Clear void Array.Clear(ArrayName); Clears (deletes) the elements of the specified Array.
Copy void Array.Copy(arraySource, arrayDest); Copies the elements of one array to another.
LastIndexOf int Array.LastIndexOf(array, searchElement); Returns the index of the last occurrence of a value in the Array.
Reverse Void Array.Reverse(arrayName); Reverses the order of the elements in an Array.

2.   The System.Threading Namespace

In C# we use the System.Threading namespace to implement multi-threading into our programs. Multi-threading is the concept of running one or more instances (known as threads) of either the same program or parts of the program simultaneously.

Consider Example 15.
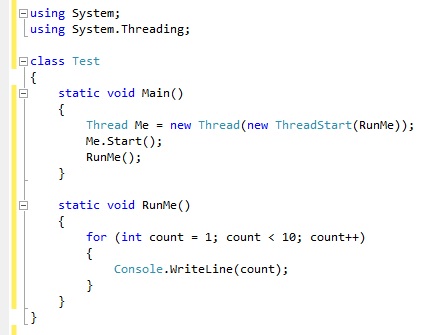
Example 15:

The System.Threading Namespace Example 15

The output of Example 15 will be as given below (your output may vary).

1
1
2
3
4
5
6
7
8
9
2
3
4
5
6
7
8
9

Let us first understand what we are trying to do in Example 15. The example consists of two methods, one obviously the Main() method and the second is the RunMe() method. What we are trying to do is run two instances of the RunMe() method from Main() at the same time such that they run in parallel. All that RunMe() method does is that it prints the numbers from 1 to 9 to your console.

In Example 15, note the syntax of the code where we create the new thread (instance) of the RunMe() Method.

  • First we create an object of the class Thread by specifying the class name
  • This is followed by the object name which in this case is Me
  • Then we put an equals to (=) sign followed by the new keyword
  • This is followed by the class name. The parameters passed to it are the new keyword with the ThreadStart class to which the method to be run is passed. This ends the Thread definition.

In the next line we begin the thread by invoking the Start() method of th Me (which is of type Thread) object. This begins a new thread which runs the RunMe() method and this method runs in parallel to our Main() method.

In the next line, after we start the thread which runs the RunMe() method, we begin the RunMe() method from Main() too. Thus, two instances of the RunMe() method running at the same time. However, since both the methods output to the same console the output seems a little garbled. Since the RunMe() thread began first it might have had started printing the numbers then when the second instance of RunMe() begins from Main() it starts writing to the same console the same numbers due to which the numbers might sometimes be repeated but not in order.

To overcome this problem C# provides you with a Lock mechanism. This lock mechanism is also known as synchronization of threads.

3.   Synchronization of Threads

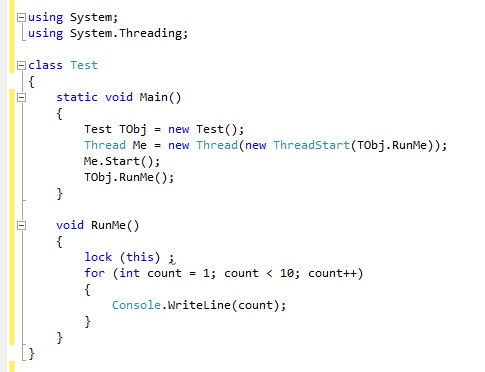
Synchronization of threads means making sure that the different threads co-ordinate their access to shared resource (For example the console). Synchronization, as mentioned earlier, is provided in C# bu the lock keyword. The lock mechanism makes sure that only one thread at a time can access a method or code. The lock mechanism has been implemented in Example 16, which is a modification of Example 15.

Example 16:

Synchronization of Threads Example 16

The output of Example 16 will be:

1
2
3
4
5
6
7
8
9
1
2
3
4
5
6
7
8
9

Note that the numbers displayed on the console (output) are now in order. This is simply because we have locked the RunMe() method. Also note that  RunMe() method is no longer static as we need to access it from an instance of the Test class also.

4.   The System.IO Namespace

The System.IO Namespace provides us with plenty of classes for file/stream input/output. This namespace also provides us with classes File and Directory, which allow us to operate on files and directories. Operations such as copying, moving, renaming and deleting can easily be done.

Consider Example 17. It lists out the files with the extension .cs in the current directory.

Example 17:

The System.IO Namespace Example 17

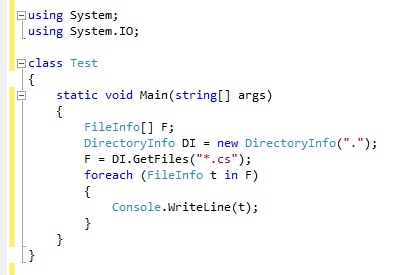
The output of the program depends on the files you have with the .cs extension in the directory you run the program from.

In Example 17, we use the GetFiles() method of the DirectoryInfo class to get all the files with the .cs extension in the current directory.

  • In the Main() method we first create an array F of type FileInfo[].
  • Next we create an object DI of the class DirectoryInfo (of the System.IO Namespace). Note tha we pass the current directory to its constructor (note that we pass the “.” which stands for the current directory).
  • We then fill up the F array with the files with the extension .cs using the GetFiles() method of the DI object.
  • Next, using the foreach loop we iterate through all the elements in the array F, and display its contents on the console.

Now we know how to list files in a directory. Let us now take a look at how to create a directory. Consider Example 18.

Example 18:

The System.IO Namespace Example 18

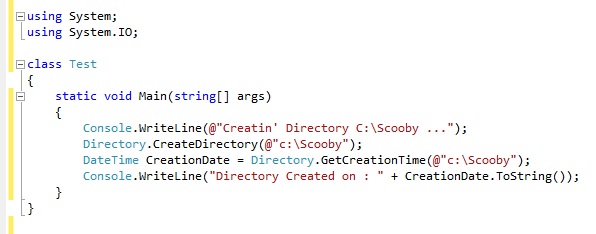
The output of Example 18 will be:

Creatin' Directory C:\Scooby ...
Directory Created on : 29-Apr-15 11:49:30 AM

In Example 18 we use the Directory.CreateDirectory() method of the System.IO namespace to create a directory. The directory name (with path) needs to be passed as the parameter to the function as seen in the code. If you look carefully, there is an @ symbol prefixed to the string passed. The @ symbol is used to override any escape sequences, which the compiler might get confused with, as we are using the “\” symbol within the string, we are passing.

Next we use the Directory.GetCreationTime() method to get the Directory creation date and time. This method takes in the directory name as the parameter and returns an object of type DateTime.

We finally write the contents of the DateTime object, CreationDate, to the console.

The other notable methods of the Directory class of the System.IO namespace along with what they do are listed below.

Method Syntax Does this…
Delete void Delete(stringPath); Deletes a directory and its contents.
Exists bool Exists(stringPath); Checks whether the given path refers to an existing directory.
GetCurrentDirectory string GetCurrentDirectory(); Gets the current directory.
GetDirectories string[] GetDirectories(stringPath); Gets an array of directories in the given directory.
Move void Move(stringSourceDirName, stringDestDirName); Moves a directory and its contents to a new path.

Using Alias Directives

If you have notices, using namespace directives pulls everything contained within the namespace into the scope. However, sometimes a need may arise that we just need to pull in one class from the namespace into the scope. The using namespace directives do not provide for this. This can be achieved using  ‘using alias directives’.

The using alias directives can be used to pull out and bring into scope one component from a namespace.

Consider Example 4. Suppose we want to pull out only the McGrill class from the McDonalds.Burgers namespace. The code for this will be as shown in Example 12.

Example 12:

Using Alias Directives Example 12

To use using alias directives we must:

  • Specify the keyword using
  • Specify an alias for the fully qualified name
  • Followed by an equals to sign (=). This is mandatory.
  • Finally specify the fully qualified path to either the namespace or the class in the namespace

In Example 12, we have created a using alias directive for a component (a class). We can similarly create using alias directives for other namespaces also in a very similar way.

As long as the scope of the using alias directives is concerned the same rules that apply to the using namespace directive apply here also.

An additional point to note here is that we have just been using classes in the namespaces in our examples so far. However, we can very well use Structs, Interfaces, Enums and Delegates in our namespaces. (Delegates will be discussed in a later post).

Using Namespace Directives

As we saw in the previous post using qualified naming tends to be a problem as code gets longer and more confusing. C# provides us with “using namespace directives”. With these you can use classes outside their namespace without using their qualified names! In other words you can make those long, confusing names short and meaningful again.

Consider Example 4. If we were to create an instance of the class McChicken we would have to do it as shown in Example 8, if we use qualified names.

Example 8:

...
McDonalds.Burger.McChicken Burger = new McDonalds.Burger.McChicken();
...

That is a long name, and a lot of code to just crate an instance of a class!

Now to bring the short name back into the picture we would make use of the keyword using to impose namespace directives!

In Example 9 we have used using to import the classes of the namespace McDonalds.Burger into the scope of the existing namespace so that we can go ahead and use unqualified naming (as shown in Example 9).

Example 9:

using McDonalds.Burger;

McChicken Burger = new McChicken();
McGrill Burger2 = new McGrill();

To use the using namespace directive you just have to specify the using keyword followed by the qualified path for the namespace and a semi-colon.

1.   The using namespace directives and scope

The using namespace directives can have a global scope provided they are declared before any member declarations.

The using namespace directives can also be declared within namesapces. However, in this case their scope ends with the namespace and the rule, using should appear before any member declaration applies here also.

2.   Ambiguous names

Consider Example 2. The class Burger exists in both namespaces McDonalds and BurgerKing. Now if we were to implement those namespaces as shown in Example 10, what do you think would happen?

Example 10:

Using Namespace Directives Example 10

This is a very ambiguous situation and the compiler will not know which Burger class to call (from namespace McDonalds or namespace BurgerKing). Hence the compiler generates an error. In such cases we have no other choice but to use qualified namespaces as shown in Example 11.

Example 11:

Using Namespace Directives Example 11

Namespaces

When working on a huge project is quite obvious that you will be creating a lot of classes. It becomes equally obvious that sometimes the names of these classes might clash. There are two ways you can solve this problem. The first alternative is that you can rename the classes so that they no longer clash by pre-fixing their names with a descriptive unique tag, which, of course, means more undesirable, hard to remember names. The second alternative is to use namespaces.

Apart from just avoiding naming conflicts namespaces are also elements designed to help you organize your code. Making use of namespaces in your code will reduce the complexities when you want to reuse your code in some other application.

You just cannot do without namespaces in C#. In the examples discussed so far we have been using the System namespace. AS mentioned earlier, the System namespace contains all code required to interact with the system, including the console (your screen) and keyboard.

1.   Declaring a Namespace

Namespaces are declared in the same way as classes are declared. The syntax for declaring namespaces is as follows:

namespace NameSpaceName
{
   // All classes for this namespace go here!
}

To declare a namespace you do the following:

  • Begin by specifying the keyword namespace followed by any namespace name.
  • Open curly braces
  • Declare namespace members
  • Close curly braces

Consider Example 1.

Example 1:

Namespaces Example 1

In Example 1, we have considered two restaurants – McDonalds and Burger King. Both these restaurants sell Burgers and Fries. But we cannot have two classes with the same name. So we prefix the class names – Burger and Fries – with the restaurant names, so as to differentiate them. AS you can see in this case the names get messy and difficult to maintain.

Now in Example 2 we have implemented namespaces to solve the problem.

Example 2:

Namespaces Example 2

As seen in Example 2, undoubtedly is a much neater, organized and structured way to handle naming conflicts. Namespaces go a step further by allowing you to even nest namespaces within namespaces.

2.   Nested Namespaces

Namespaces can be nested. This means you can declare another namespace within a namespace.

Suppose we need to create classes for each and every type of burger within the Burger class of the namespace McDonalds. We, of course, can nest classes, but a more efficient way of doing this would be to nest namespaces as shown in Example 3.

Example 3:

Namespaces Example 3

It is legal to nest a namespace, as in Example 3, where we have a Burger namespace right inside the McDonalds namespace. The syntax for declaring either of the namespaces does not differ. You just have to make sure that the second namespace appears within the opening and closing braces (also known as scope) of the first namespace.

As you can see Namespaces allow you to create a system to organize your code. A good way to organize your namespaces is by following a hierarchical system. You put the more general names at the top of the hierarchy and get more specific as you go down the hierarchy. This hierarchical system can be represented by nested namespaces.

There is also another easier way to create nested namespaces. Consider Example 4.

Example 4:

Namespaces Ecample 4

The result of Example 4 is just the same as Example 3. However, note that Example 4 specifies the nested namespace with the dot operator between McDonalds and Burger. You are provided with this “shorthand” to help you create nested namespaces easier and faster. This sort of “shorthand” debuts in C# and is not available in C++.

3.   Access Modifiers and Namespaces

Namespaces are public implicitly. You cannot override this by specifying access modifiers. Namespace cannot be protected, private or internal, in other words they can only exist as public.

If you try to declare a namespace with an access modifier (as in Example 5) the compiler generates an error.

Example 5:

Namespaces Example 5

The compiler will generate errors at both the namespace declarations. No access modifiers should be prefixed while declaring namespaces.

4.   Qualified Naming

When you use a class inside its namespace, you only need to specify the class name. This is referred o us Unqualified name (also known as short name). Now, suppose you wish to use a class outside a namespace it is out of the scope of the namespace and you must refer to the class by using its fully qualified name (also known as long name). A fully qualified name is the name of the class prefixed by the namespace it is contained within and the dot operator.

Consider Example 2 again. If we were to create an instance of the class burger from within the McDonalds namespace we would write the following code as in Example 6.

Example 6:

Namespaces Example 6

The code would work just fine and an instance of the Burger class from the McDonalds namespace would be created. This is referred to as unqualified naming. However, suppose we need to create an instance of the Burger class of the McDonalds namespace within the BurgerKing namespace. In this case we will have to use qualified naming by prefixing the class name with the namespace. The same is shown in Example 7.

Example 7:

Namespaces Example 7

Note that if you had not used qualified naming in Example 7, the compiler would have created an instance of the Burger class of the namespace BurgerKing. You would have landed up having a BurgerKing burger for lunch!

However, if you have noticed, using qualified namespaces makes code longer and more difficult to read. C# does have an answer to this problem too. We shall deal with it in the next post.

Interfaces

As you have seen in the previous post, Abstract Base Classes can have both abstract as well as non-abstract methods. But if you need to define a class, which just contains abstract methods and nothing more, in other words a “pure abstract base class” you would create an Interface.

An interface is very much similar to a pure abstract base class. It can contain only abstract methods and no method implementations. An instance of an Interface can never be created. An interface instead is used to indicate that a class that implements the particular interface must implement the members listed by the interface.

Earlier, we had said that classes are like moulds that define the methods and data members an object should have. Similarly, an interface can be considered as being a mould for a class. It indicated what a class must provide.

Let us take a look at some code depicting Interfaces. Consider Example 6,

Example 6:

Interfaces Example 6

Example 6 depicts an interface. Interfaces are defined in the same way as classes except that the interface keyword needs to be specified after the access modifier, followed by an interface name. Interface names usually begin with the letter I depicting it to be an interface.

The method definitions go in between the open and close curly braces. In Example 6, we have defined two operations (remember in the last post we had pointed out that ‘operations’ is the name given to methods which do not have an implementation). The two operations are DeleteImage(), which returns an integer and DisplayImage(), which neither takes in any parameters nor returns any value. Also interface members do not have any access modifier, it is the class, which inherits them, that sets their visibility.

Interfaces can also have data members. However, an interface cannot have fields or only data members. It can only have properties. We shall discuss properties, their types and how to create them, in a later post.

Example 7 implements the interface shown in Example 6.

(Note the terminology, when a class makes use of an interface it (the class) is said to implement the interface.)

Example 7:

Interfaces Example 7

If we merge the code in Example 6 and Example 7 and compile it, it would give us the following output:

DisplayImage Implementation!
DeleteImage Implementation!

In Example 7 we create a new class, MyImages, which implements the interface IPict.

  • Note the syntax for implementing the interface. As in case of implementing inheritance, here too, the colon (:) operator is used.
  • Within the curly braces we have defined the implementations for the methods in the interface. An interesting point to note here is that unlike in the case of abstract base classes, we are not overriding the methods but just implementing them, hence, the keyword override need not be specified at all.
  • The manner in which the class is instantiated in the Main() method and the manner in which its methods are called remain unchanged.

A class can implement an interface as well as inherit from another class. Consider another class called BaseIO with the implementation as shown in Example 8.

Example 8:

Interfaces Example 8

Now, suppose we want to inherit the MyImages class from this class. We can always do so. The code would look as shown in Example 9.

Example 9:

Interfaces Example 9

The output of Example 9 will be as shown below:

DisplayImage Implementation!
DeleteImage Implementation!
This is the Open method of BaseIO

(If you have to get the above result you need to add the code in Example 8 and Example 6 into Example 9.)

Note that if you want to inherit from a class as well as implement an interface you use a comma (,) between the class name you wish to inherit from and the interface you wish to implement. The rest remains just the same.

1.   Multiple Interface Implementation

C# does not allow multiple class inheritance. However, it allows multiple interface implementations. A class can implement more than one interface. Consider Example 10 as an extension of the previous examples.

Suppose we have another interface called IPictManip, which consists of only one method to apply alpha blending to our images. The code for this will be as shown in Example 10,

Example 10:

Interfaces Example 10

If we wanted to use the functionality of the above-mentioned interface into the class MyImages (meaning implementing two interfaces, IPict and IPictManip) we will need to write code (for declaring MyImages) as shown in Example 11.

Example 11:

Interfaces Example 11

The output of Example 11 will be:

DisplayImage Implementation!
DeleteImage Implementation!
This is the Open method of BaseIO
ApplyAlpha Implementation!

As you can see in Example 11, all you do is add another comma and the interface name during the MyImages class definition (the part made bold in Example 11). We implement the ApplyAlpha() method within class MyImages and call methods as usual.

Multiple interface implementation is completely acceptable in C# as long as no naming conflicts occur. For example if both interfaces (IPict and IPictManip) have an operation called DisplayImage with the same signature (return types and parameters), we have a problem, since it is not possible to specify which interface we are implementing when we write the implementation for the method DisplayImage().

C# provides us with a solution for this problem by providing Explicit Interface Implementation. We shall discuss this in the next section.

2.   Explicit Interface Implementation

To specify which interface a member function is implementing you need to qualify the member function by putting the interface name before the member name. Getting back to the previous example, consider that the operation DisplayImage() exists in both the interfaces (IPict and IPictManip). This poses a problem of ambiguity. Explicit interface implementation cab be used to solve this problem. The corresponding code will be as shown in Example 12.

Example 12:

Interfaces Example 12

3.   Interface Inheritance

New interfaces can be created by combining together other interfaces. The syntax for this is very similar to that used for inheritance, except that more than one interfaces can be merged to form a single interface.

Suppose you want to merge two interfaces IPict and IPictManip into one interface IPictAll you would need to do the following.

Example 13:

Interfaces Example 13

Abstract Base Classes

A situation may arise where you need to only inherit from a certain class, but need not instantiate objects of that class. In such a case the base class can be regarded as “incomplete”. Such classes are known as Abstract Base Classes. C# allows creation of Abstract Base Classes by an addition of the abstract modifier to the class definition. Instances of abstract base classes cannot be created.

These abstract base classes can only contain the method definitions, the actual implementation of the method is made only in the derived class. This means that the abstract base class holds only the function prototypes (the return type of the method, the name and the parameters it takes) but no code for the body (the implementation of the method, the code which defines what the method has to do). The body of the function is written in the derived class. The method with no implementation is known as an operation.

Consider the following example,

Example 5:

Abstract Base Classes Example 5

The output of Example 5 will be,

This is the AFunc() method!
This is the BFunc() method!

In Example 5 we have declared an abstract base class by the name ABC. Note that to declare a class as abstract we just need to add the abstract keyword to the regular class syntax.

  • An abstract base class can also contain methods with implementations, apart from containing abstract methods (operations).
  • The operations also need to be marked with an abstract keyword.
  • The operations definition always ends with a semi-colon.

Getting back to Example 5, we have created a new class named Derv, which derived from class ABC. Thus, the class Derv can override the abstract AFunc() method of its base class ABC.

To override the abstract method from the abstract base class the syntax is very similar to that of overriding a virtual function. All you have to do is,

Specify,

  • The keyword override.
  • Make sure that the method names are just the same, including the parameters.
  • Write the necessary code (implementation).

In Example 5, in the Main() method we have declared an object of type ABC (which is the Abstract Base Class). However, note here that we are just creating an object of type ABC, we are not instantiating an object of that type. If we try to instantiate the object, the C# compiler will generate an error as instances of ab abstract base class cannot be created.

When the AFunc() method of class ABC is called it automatically calls the overridden function of class Derv. Also note that we have created an object a of the type ABC (this Abstract Base class) and we have simply copied the object to another object (remember they belong to reference types so only the reference is copied). Now we can use object a just as object b. In the Main() function we have tried calling AFunc() and the BFunc() methods just as we do from object  b and, as you can see in the output, it works just the same.

Polymorphism In C#

C# is a genuine object-oriented programming language. It Implements all of the major OOP features including polymorphism. Polymorphism and virtual functions go hand in hand. In fact polymorphism is achieved using virtual methods. Polymorphism allows you to implement methods of the derived class during run-time. Polymorphism sounds confusing at the beginning thus, many times people tend to skip this topic. It takes a little patience and dedication to learn the advantages offered by this OOP feature.

Looking at some code should help make things clear.

Consider Example 1,

Example 1:

Polymorphism in C# Example 1

In Example 1 we create a class DrawObj, in which we define a virtual method called Draw(). All that the Draw() method does is that it displays a message on the user’s screen.

A point to note here is that the Draw() method is a virtual method. Note the syntax, it is similar to the one for a normal method except that the virtual keyword needs to be specified.

Virtual functions come in handy when we need to call the derived class method from an object of the base class.

Suppose you need to assign a group of objects to an array and then invoke each of their methods. They will not necessarily have to be the same object type. However, if they are related by inheritance, you can add them to the array as the inherited type. Then if they all share the same method name, that method of each object can be invoked. This may sound a bit confusing. The following example will make things clearer.

Consider Example 2 as an extension of Example 1.

Example 2:

Polymorphism in C# Example 2

In Example 2, we have defined three classes (namely Line, Circle and Square). All of them are derived from the class DrawObj and all of them override the Draw() method of the DrawObj class.

So far we have been building the program part by part. Next we shall write the Main() function of the program, which will bring all these pieces (and classes) of code together, in Example 3.

Example 3:

Polymorphism in C# Example 3

If we merge the code in Examples 1, 2 and 3, compile and run, the output will be,

This is the Virtual Draw method
This is the Draw() method of Line
This is the Draw() method of Circle
This is the Draw() method of Square

Note the output. The Draw() method for each and every class derived from DrawObj has been called. However, we have written the Draw() method only once. Then how did this happen? Simple, note that the Draw() method has been written inside the foreach loop, which iterates through the DrawObj type objects in the array ObjD and calls the Draw() method. You would want to know how the method of the derived class is called while the array is of type DrawObj (the base class). This happened just because the code that we wrote exhibits polymorphism.

In the Main() function of Example 3, we have declared an array called ObjD to hold four objects of the type DrawObj. Next we have initialized the array with objects of the derived classes (namely line, circle and square). The first element being, of course, the DrawObj itself. We are allowed to assign the objects to an array of the base class because of the inheritance relationship that the derived class objects have with the DrawObj. Inheritance allows derived objects to act like their base class objects, which saves us a lot of coding. If this was not possible we would end up creating a different array for each type.

In case you need another example to clear doubts you might have on polymorphism, consider Example 4.

Example 4:

Polymorphism in C# Example 4

The output of Example 4 will be:

600
    • Note that the MethodA() is not overridden in class B. When we call MethodA() from an object of class B, the MethodA() of class A gets called as class B is inherited from class A.
    • Now MethodA() of class A needs to call MethodB(). There exists a MethodB() in class A as well as in class B.
    • Now if we were to use the normal method overriding, and had not defined our overridden methods as virtual, the MethodB() of class A would have been called and the output would have been 200.
    • Next, we have specified the MethodB() of class A as virtual and also overridden this MethodB() of class A in class B.
    • Since the call to MethodA() has come in from class B, the overridden method in class B is called.
    • Polymorphism is not just overriding it is intelligent overriding.
    • The difference between overriding and polymorphism is that the decision as to which method to call (whether the base class one or the class from which the object was instantiated) is made at runtime!
    • Remember, Polymorphism requires virtual functions, and virtual functions in turn require method overriding, that is the association between polymorphism and overriding.